Installation
Requirements
Running the BEAST requires:
- Python 2.7 or >=3.4
- Astropy 1.3
In turn, Astropy depends on other packages for optional features. From these you will need:
- hdf5 to read/write
Tableobjects from/to HDF5 files.
You will also need:
- PyTables to manage large amounts of data.
One easy way to obtain the above is through the AstroConda Python stack:
- First install Miniconda which
contains the conda package manager. Once Miniconda is installed,
you can use the
condacommand to install any other packages and create environments, etc. - Setup the AstroConda Channel:
$ conda config --add channels http://ssb.stsci.edu/astroconda
- Install AstroConda with Python 3 (recommended):
$conda create -n astroconda stsci
- Install AstroConda with Python 2.7 (still possible):
$ conda create -n iraf27 python=2.7 stsci pyraf iraf
- Make sure that the
PyTablesandhdf5packages are installed:
$ conda install -n astroconda (or iraf27) pytables
$ conda install -n astroconda (or iraf27) hdf5
Installing the BEAST
For the BEAST to work properly, you need to place a ‘libs’ directory containing files related to filters, photometry, stellar atmospheres, and in the future, stellar evolution models. See Obtaining BEAST libraries below.
Option 1
The following is the recommended option which will allow you to easily keep up with code updates. If additionally you would like to contribute to code enhancements, see Option 3 below.
Places BEAST on your local computer as a clone of the BEAST GitHub repository. To do this, go to the directory where you want to place the BEAST and type the following:
$ git clone https://github.com/BEAST-Fitting/beast.git
This will create a directory named ‘beast’ containing the BEAST.
Option 2
This option places BEAST in its current version on your local computer. One disadvantage is that you will have to manually obtain BEAST updates from the GitHub repository if you use this option.
On the BEAST GitHub homepage click on the ‘Clone or Download’ button, then select ‘Download ZIP’. Unzip the file in the desired directory.
Option 3
This option is suitable if you plan to make code contributions to the BEAST. See the :ref:’beast_development’ for details.
Obtaining BEAST Library Files
For the BEAST to work properly, you need to place a ‘libs’ directory containing files related to filters, photometry, stellar atmospheres, and in the future stellar evolution models in the ‘beast/beast’ directory. Follow this link to download the ‘libs’ files.
Confirming Proper Installation and Running Sample Code
There is a small sample script named ‘run_beast.py’ located in ‘beast/beast/examples/phat_small’ as a quick check to confirm that BEAST installation is working.
In ‘beast/beast/examples/phat_small’, place a soft link named ‘beast’ pointing two levels up:
$ cd beast/beast/examples/phat_small
$ ln -s ../../ beast
If you installed Python through AstroConda, first activate the correct AstroConda environment:
$ source activate astroconda
Verify that the current default Python is version 3:
$ python --version
Now try a sample BEAST run:
$ ./run_beast.py or $ python run_beast.py
Optionally, you can run BEAST with one, or a combination, of these arguments
-h, --help show this help message and exit -p, --physicsmodel Generate the model grid -o, --observationmodel Calculate the noise model -t, --trim Trim the model and noise grids -f, --fit Fit the observed data -r, --resume Resume a run
For example: $ ./run_beast.py -h or $ ./run_beast.py -potf
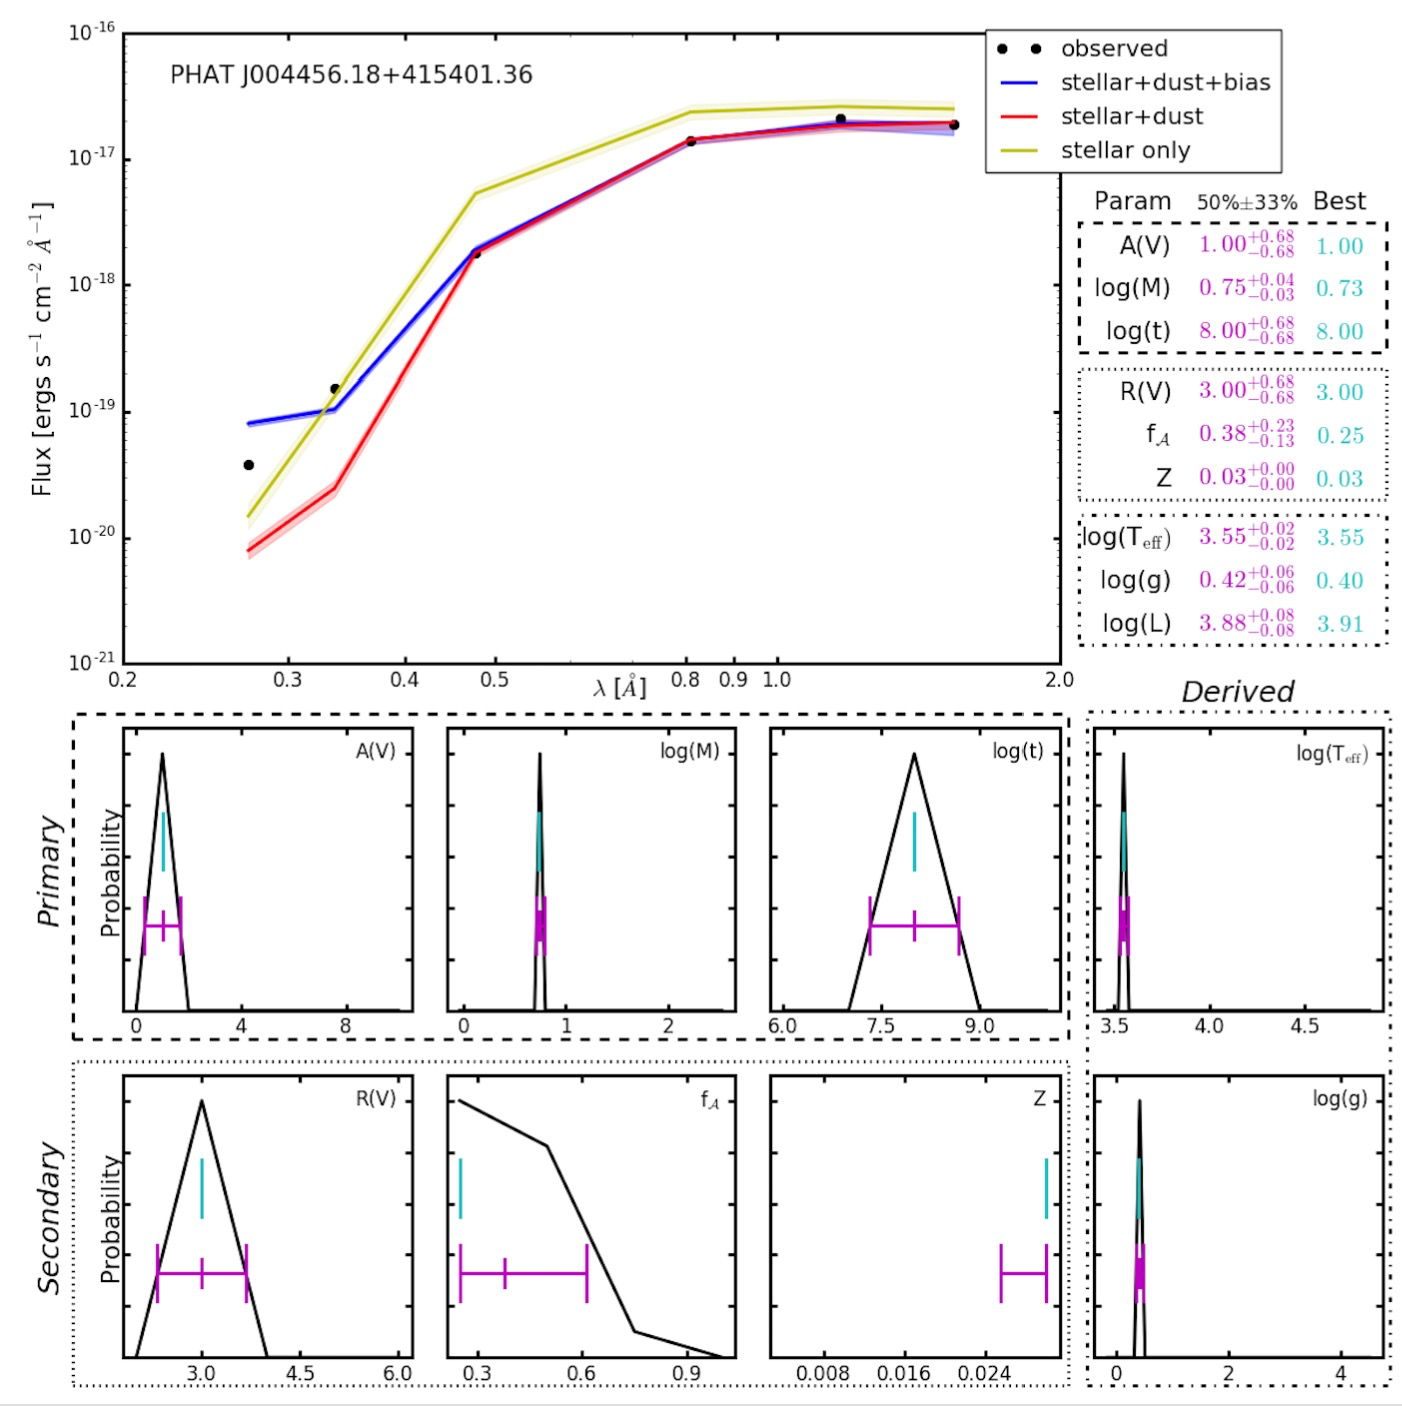
If the BEAST is running correctly the second command should run without errors and should have written the output files into ‘beast_example_phat/’. The result can be plotted using
$ python beast/plotting/plot_indiv_fit.py beast_example_phat/beast_example_phat
The argument for this script is the prefix of the output files. The output should look like this: