Installation
Requirements
Running the BEAST requires:
- Python >=3.4 (recommended) or 2.7 (still possible)
- Astropy >=1.3
In turn, Astropy depends on other packages for optional features. From these you will need:
- hdf5 to read/write
Tableobjects from/to HDF5 files.
You will also need:
- PyTables to manage large amounts of data.
One easy way to obtain the above is through the AstroConda Python stack:
First install Miniconda which contains the conda package manager. Once Miniconda is installed, you can use the
condacommand to install any other packages and create environments, etc.Setup the AstroConda Channel:
$ conda config --add channels http://ssb.stsci.edu/astroconda
Install AstroConda with Python 3 (recommended):
$conda create -n astroconda stsci
Install AstroConda with Python 2.7 (still possible):
$ conda create -n iraf27 python=2.7 stsci pyraf iraf
Make sure that the
PyTablesandhdf5packages are installed:$ conda install -n astroconda (or iraf27) pytables $ conda install -n astroconda (or iraf27) hdf5
Installing the BEAST
In addition to installing the code, library files also need to be installed. See BEAST Library Files.
Using pip
beast can also be installed using pip:
# from PyPI
$ pip install beast

# if you already have an older version installed
$ pip install --upgrade beast

# from the master trunk on the repository, considered developmental code
$ pip install git+https://github.com/BEAST-Fitting/beast.git
From source
beast can be installed from the source code in the normal
python fashion after downloading it from the git repo:
$ python setup.py install
For developers
This option is suitable if you plan to make code contributions to the BEAST. See the BEAST Development for details.
BEAST Library Files
For the BEAST to work properly, you need to place a set of files in a directory. These files contain information related to filters, stellar atmospheres, and in the future stellar evolution models.
Location
There are 3 possible locations for these files (in the order the code will search for them):
- in a directory designated by the BEAST_LIBS environment variable
- in the ‘.beast’ directory in the home directory of the current user
- in the source code in ‘beast/beast/libs’
Whichever of the options used, the directory needs to be manually created.
Manual download
Running Example
You can find examples of BEAST runs in the <https://github.com/BEAST-Fitting/beast-examples> repository.
Inside each example, there is a run_beast*.py script.
phat_small example
This example is based on a very small amount of PHAT old data.
If the beast has not been installed (only downloaded from github), then In the ‘phat_small’ directory, place a soft link named ‘beast’ to where the beast code is located. Specifically:
$ cd beast-examples/phat_small

$ ln -s beast_code_loc/beast/beast beast
If you installed Python through AstroConda, first activate the correct AstroConda environment:
$ source activate astroconda
Verify that the current default Python is version 3:
$ python --version
Now try a sample BEAST run:
$ ./run_beast.py
or:
$ python run_beast.py::
Optionally, you can run BEAST with one, or a combination, of these arguments
-h, --help show this help message and exit -p, --physicsmodel Generate the model grid -o, --observationmodel Calculate the noise model -t, --trim Trim the model and noise grids -f, --fit Fit the observed data -r, --resume Resume a run
For example: $ ./run_beast.py -h or $ ./run_beast.py -potf
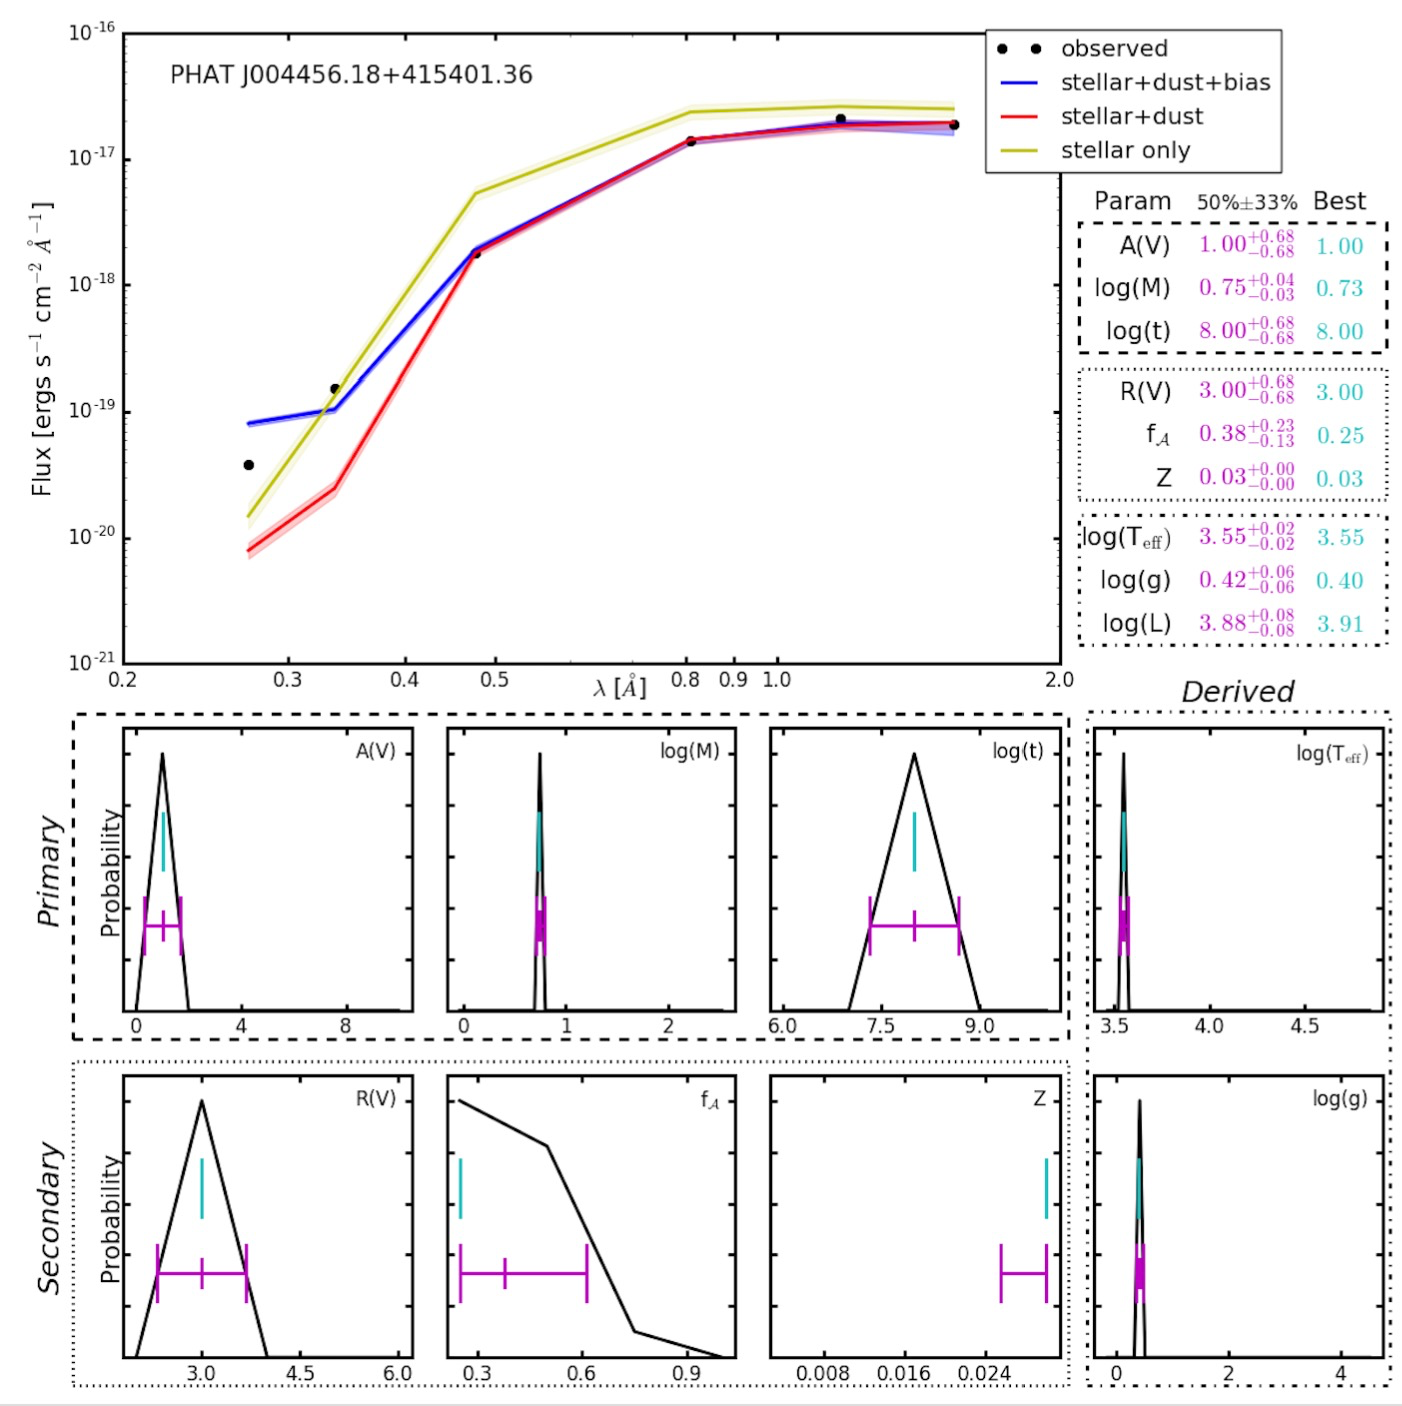
If the BEAST is running correctly the second command should run without errors and should have written the output files into ‘beast_example_phat/’. The result can be plotted using:
$ python beast/plotting/plot_indiv_fit.py beast_example_phat/beast_example_phat
The argument for this script is the prefix of the output files. The output should look like this: